
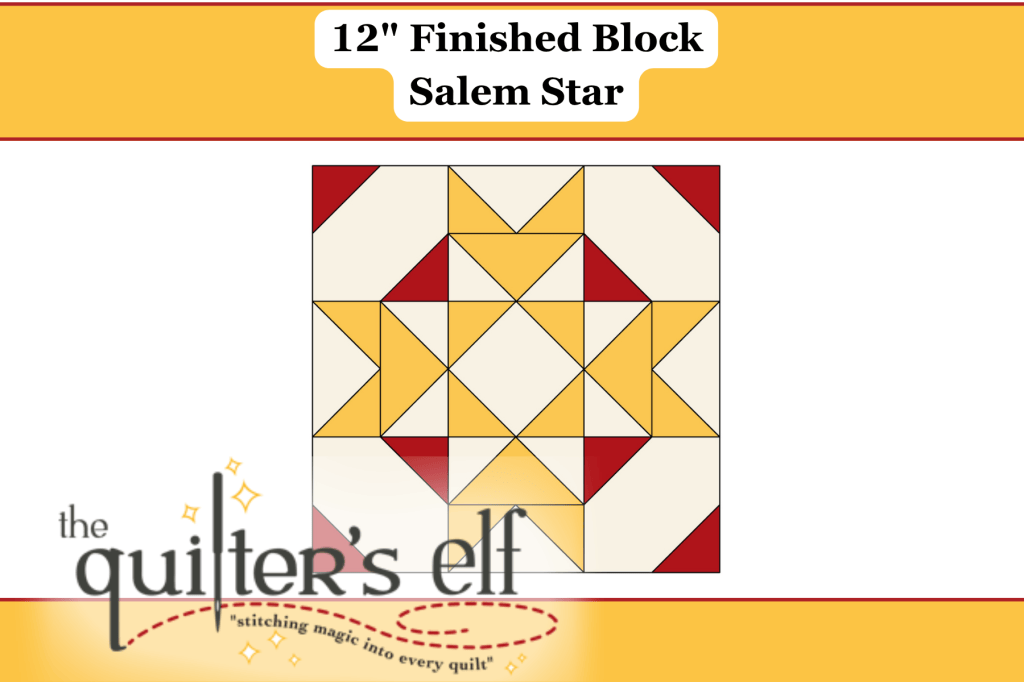
From the 2026 Sew Flake Mystery Quilt Challenge
August Block Two: Salem Star
Instructions by Julie. Posted by Tia. (See PDF copy)
You will need 4 Fabrics: Use the Coloring Diagram as needed.

1 – Cut:
- Background Fabric:
- Cut (5) 4 1/2” x 4 1/2” squares
- Cut (4) 2 1/2” x 4 1/2” rectangles
- Cut (1) 2 1/2” x 21” strip then Sub Cut (8) 2 1/2” x 2 1/2” squares
- Light Fabric (or Medium):
- Cut (4) 2 1/2” x 4 1/2” rectangles
- Cut (1) 2 1/2” x 31” strip then Sub Cut (12) 2 1/2” x 2 1/2” squares
- Dark Fabric:
- Cut (1) 2 1/2” x 21” strip then Sub Cut (8) 2 1/2” x 2 1/2” squares.
Julie’s Note: All seams on this square should be sewn with the ‘scant ¼” inch’ method.
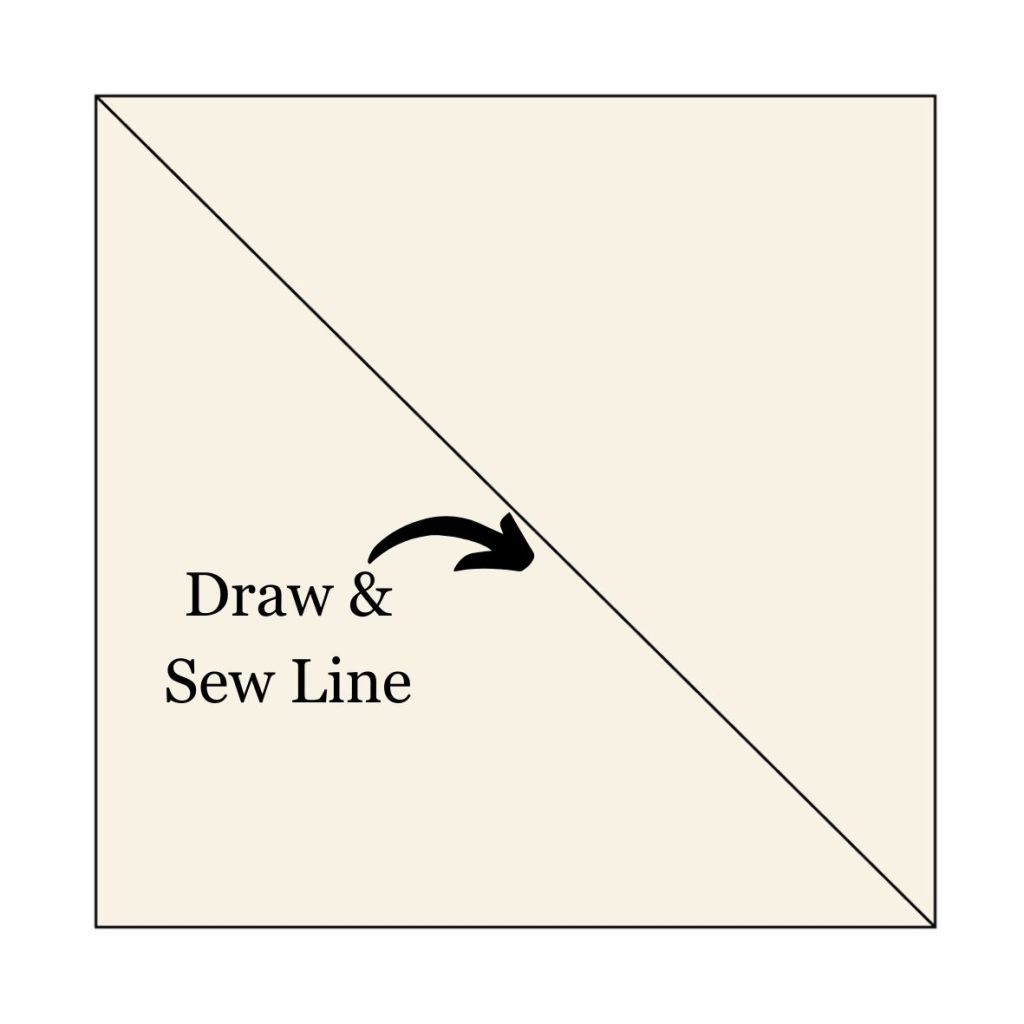
2 – Mark: Mark all the 2 1/2” x 2 1/2” squares with a diagonal across the back. This should be done with a light pencil or a removable fabric type of marker. Frixion pens work well.
3 – Make Corner Blocks: Sew (2) Dark Fabric 2 1/2” x 2 1/2” squares to opposite corners of (1) Background Fabric 4 1/2” x 4 1/2” square. See diagram. The finished block should measure 4 1/2” x 4 1/2”. Make 4 total Corner Blocks.
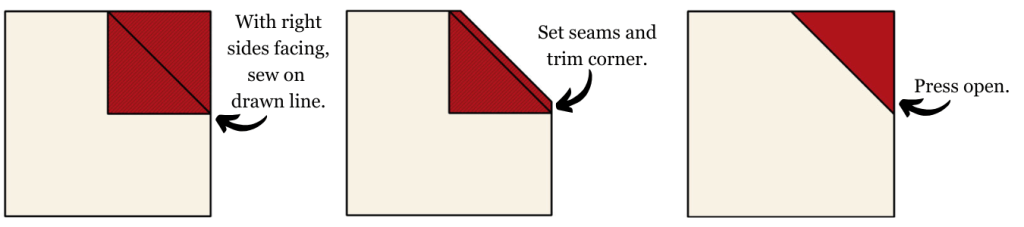

4 – Start Flying Geese: Lay (1) Background Fabric 2 1/2” x 2 1/2” squares, right sides together on the end of (1) Light Fabric (or Medium) 2 1/2” x 4 1/2” rectangle as shown in the diagram. The marked diagonal line should be in the middle of the 4 1/2” rectangle, going to the outside corner. (See diagram.)
Sew along the marked line. You will be sewing only one side of the 4 1/2” rectangle. You will do this with (4) Background Fabric 2 1/2” x 2 1/2” squares on all (4) Light Fabric (or Medium) 2 1/2” x 4 1/2” rectangles. Then use the same method to attach (4) Light Fabric (or Medium) 2 1/2” x 2 1/2” squares on all (4) Background Fabric 2 1/2” x 4 1/2” rectangles.
The chain method works well on this step. When you have completed sewing the first square on all 8 units, trim the seam down to 1/4”. Set your seam and press to the side.
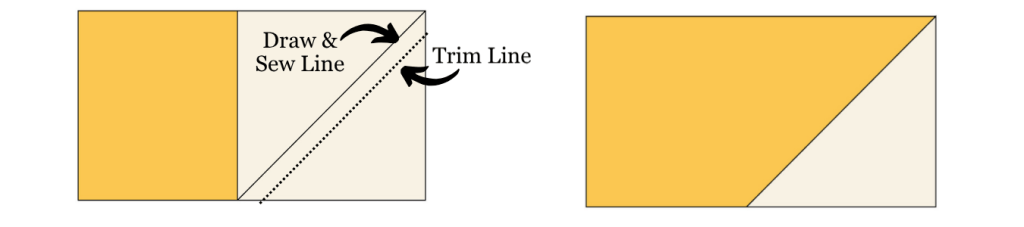
Julie’s Note: I like to place my needle just to the right side of the marked line (away from the center of the rectangle). This helps compensate for the space of the marking on the fabric. This slight variance seems to be effective. When I place my needle just to the right edge of the line, the block works correctly.
5 – Finish Flying Geese: Lay the remaining 2 1/2” x 2 1/2” squares, right sides together on the opposite end of the rectangles. The marked diagonal line should be in the middle just overlapping the first block sewn, going to the outside corner. (See the diagram).
You will do this with (4) Background Fabric 2 1/2” x 2 1/2” squares on all (4) Light Fabric (or Medium) 2 1/2” x 4 1/2” rectangles. Then use the same method to attach (4) Light Fabric (or Medium) 2 1/2” x 2 1/2” squares on all (4) Background Fabric 2 1/2” x 4 1/2” rectangles.
Using the chain method, sew the remaining 2 1/2” x 2 1/2” squares to the correct rectangle. When completed, clip apart the chain and trim the seams down to 1/4” inch. Set your seam and press to the side.
There should be (4) Light Fabric (or Medium) geese with Background Fabric corners and (4) Background Fabric geese with Light Fabric (or Medium) corners.
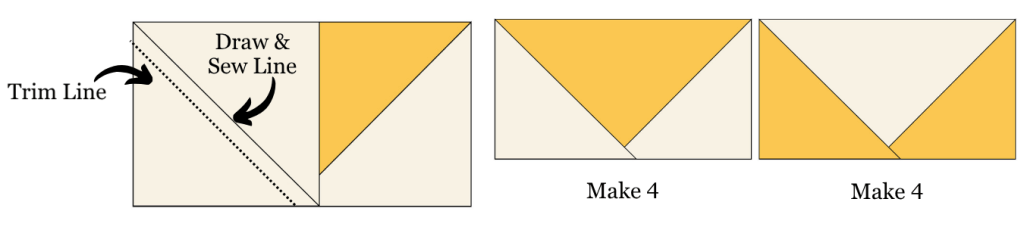
6 – Assemble Flying Geese Blocks: Make (4) Flying Geese Blocks using two finished Flying Geese rectangles. See diagram.

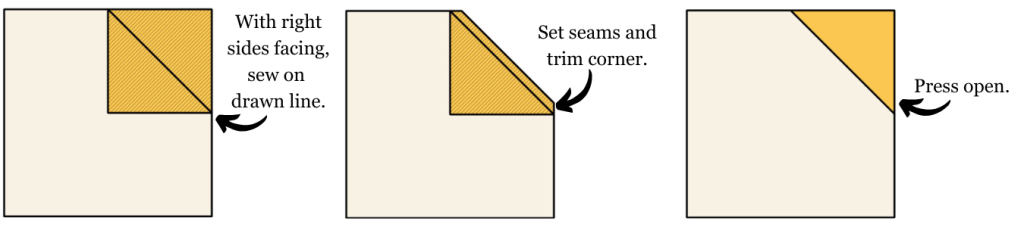
7 – Start the Center Block: Sew (2) Light Fabric (or Medium) 2 1/2” x 2 1/2” squares to opposite corners of (1) Background Fabric 4 1/2” x 4 1/2” square. See diagram. The finished block should measure 4 1/2” x 4 1/2”. Trim if necessary.

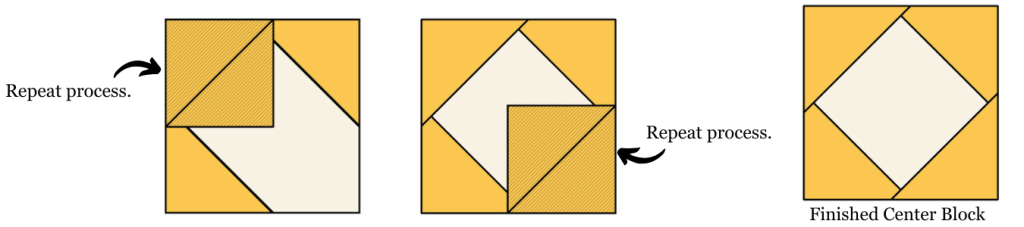
8 – Finish Center Block: Sew (2) Light Fabric (or Medium) 2 1/2” x 2 1/2” squares to the remaining opposite corners of (1) Background Fabric 4 1/2” x 4 1/2” square. See diagram.
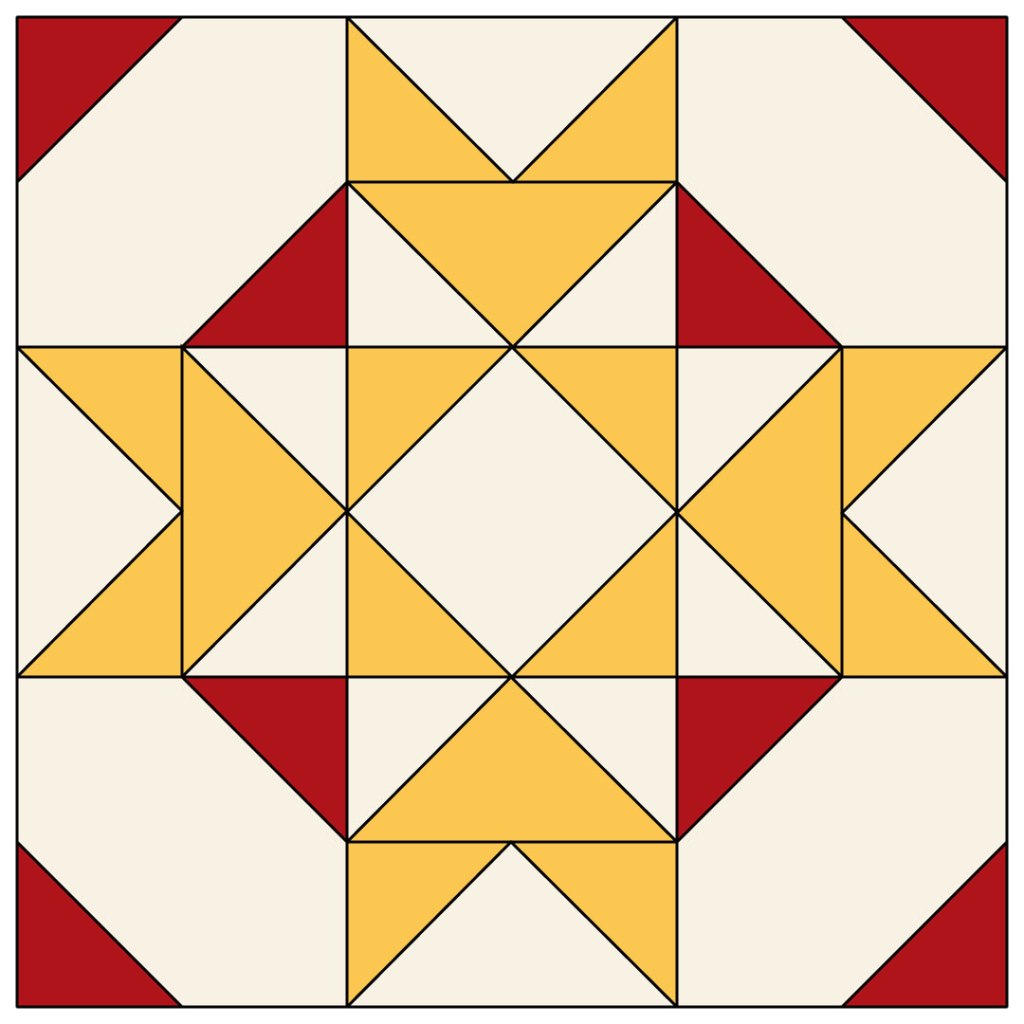
9 – Arrange: Arrange (1) Center Block, (4) Corner Blocks, and (4) Flying Geese Blocks as shown in the diagram. Sew together in order shown in the diagram. *** Note: Use regular ¼” seams to assemble the block
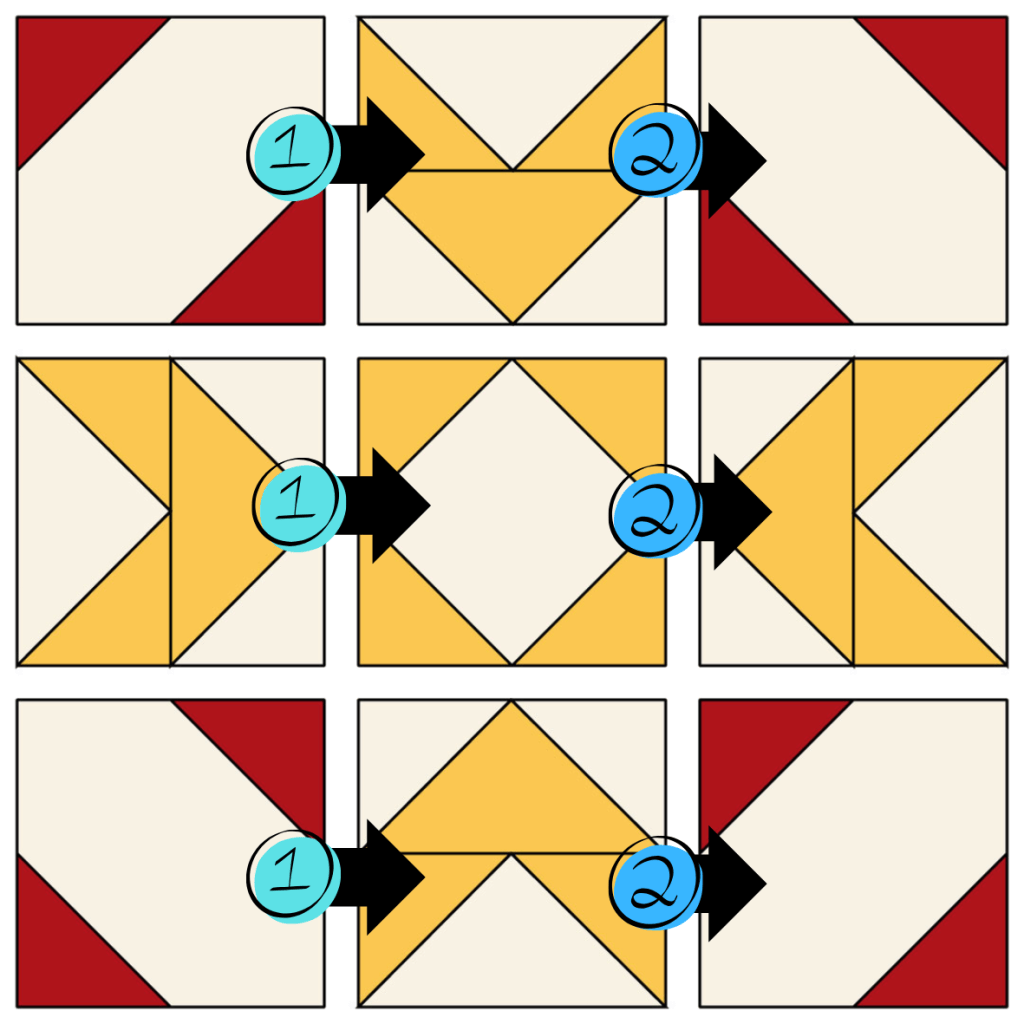
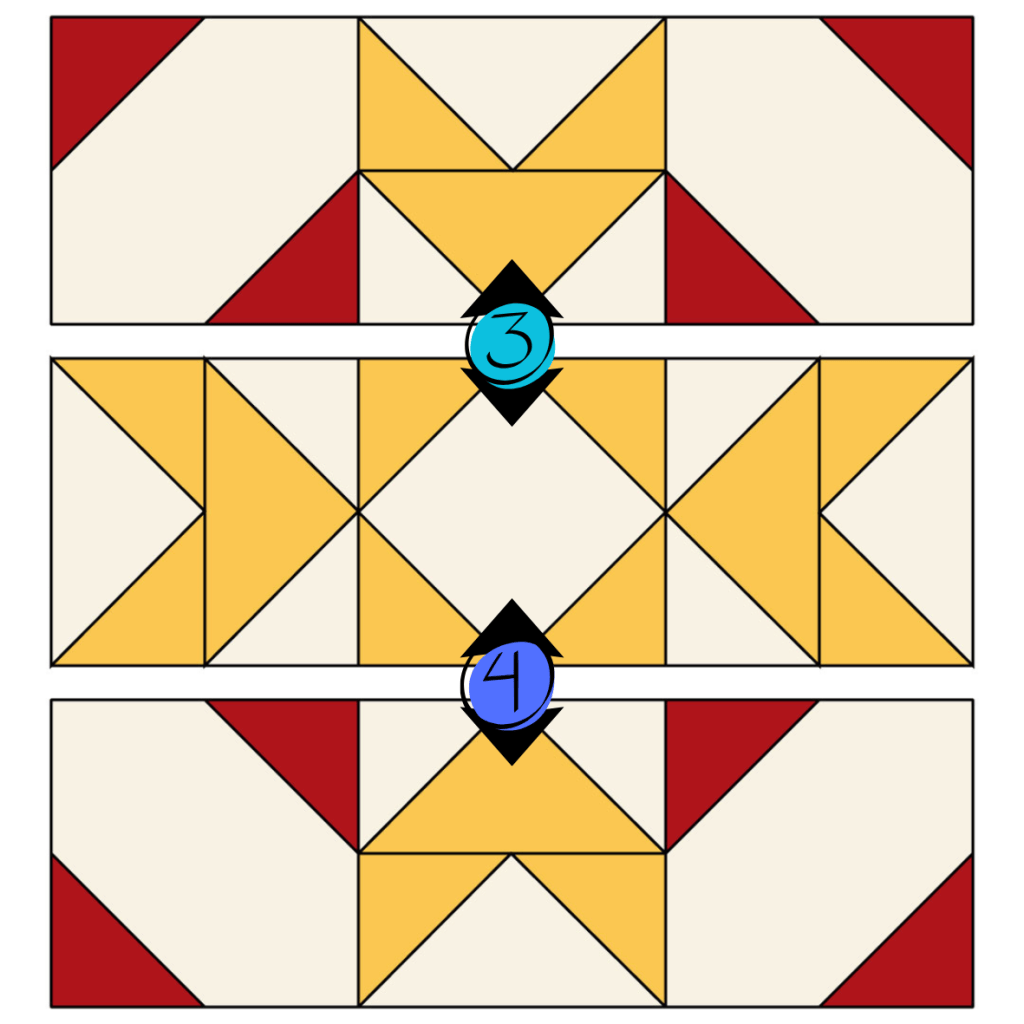
10 – Complete: Your completed block should measure 12 1/2” x 12 1/2” square.
 The Quilter's Elf
Leave a comment